NestJS JWT Authentication with Refresh Tokens Complete Guide

Elvis Duru / July 7, 2022
17 min read • --- views
Introduction
In this guide, we’ll learn how to implement token-based authentication in a Nest.js app using JWT. At the end of the tutorial, you would have built a production ready Node.js backend with JWT Authentication setup. As a bonus, we’ll also learn what Refresh tokens are, how they work and how to implement them. Let’s dive in!
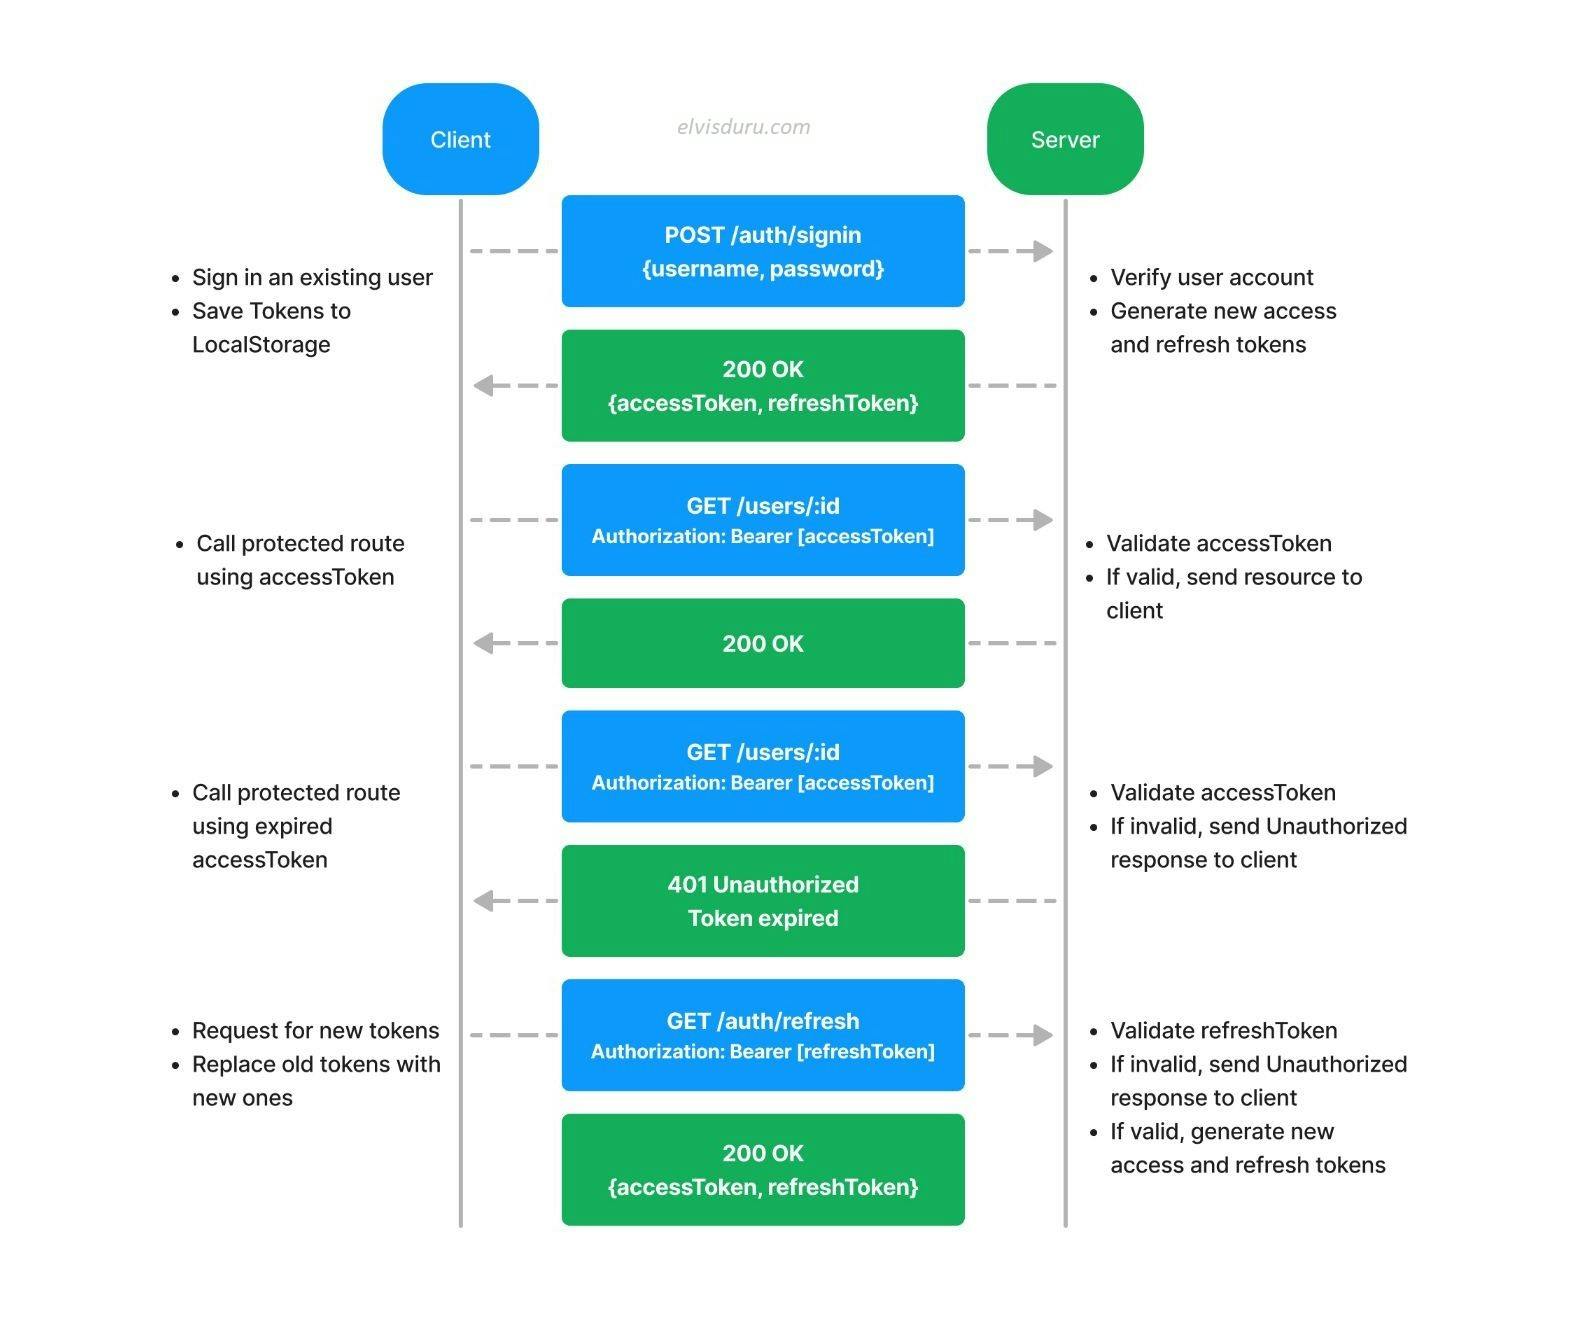
What is Token-based Authentication?
Token-based authentication is a security technique that allows users verify their identity when signing in, and in turn they receive a secure token that they can use to access protected resources on a server. A token is a small piece of data, usually encoded as a JSON object (JWT), that contains all the information needed for authentication or authorization. If you’re curious, you can learn more about JSON Web Tokens (JWTs) in this article.
Prerequisite
Before we implement the token-based authentication feature, we need to quickly create a nest.js application. We will be using Mongoose as our database ORM. You can skip this step if you have an existing nest.js project.
Show prerequisite steps
Install Nest.js
Run the following command in your terminal to create a fresh Nest.js application. You can replace the name token-auth-app with your app’s name:
npm i -g @nestjs/cli
nest new token-auth-app
Create and Setup a Database
We’re using MongoDB as the database for our application. Install the required dependencies using this command:
npm install --save @nestjs/mongoose mongoose
After installation, import the MongooseModule into the root AppModule.
import { Module } from '@nestjs/common';
import { MongooseModule } from '@nestjs/mongoose';

@Module({
  imports: [MongooseModule.forRoot('**your-database-url**')],
})
export class AppModule {}
Note that I already have a database provisioned using MongoDB Atlas. Be sure to replace your-database-url with an actual database URL.
Overview

Our Nest.js app is simple. It is going to have the following basic features/requirements:
- Users can create new accounts and sign in with a username and password.
- User’s information will be stored in a database.
- Only authenticated users can edit their information saved in the database.
- A public route to fetch all users that signed up on the app.
To fulfil the above requirements, we’ll need to provide the following API endpoints to the client:
| Method | API Endpoint | Access | Description |
|---|---|---|---|
| /POST | /auth/signup | PUBLIC | Create a new user account |
| /POST | /auth/login | PUBLIC | Sign in an existing user |
| /GET | /auth/logout | PROTECTED | Log out an existing user |
| /GET | /auth/refresh | PROTECTED | Refresh auth tokens |
| /GET | /users | PUBLIC | Fetch all users |
| /GET | /users/:id | PUBLIC | Fetch a single user |
| /PATCH | /users/:id | PROTECTED | Edit a user’s information |
Create the User Resource
Let’s create the user resource. In your project’s root directory run the following command:
nest g res users --no-spec
The nest g command generates files for us based on a schematic. nest g resource tells nest cli to create a new resource. In the example above we’re using it to automatically generate a users resource with all files and boilerplate code written for us. In the prompt that follows be sure to select REST API.
User Model Injection
Create a new folder named schemas in the users directory that was just created by nest cli. Inside the folder, create a file named user.schema.ts and write the following lines of code:
import { Prop, Schema, SchemaFactory } from '@nestjs/mongoose';
import { Document } from 'mongoose';

export type UserDocument = User & Document;

@Schema()
export class User {
  @Prop({ required: true })
  name: string;

  @Prop({ required: true, unique: true })
  username: string;

  @Prop({ required: true })
  password: string;

	@Prop()
  refreshToken: string;
}

export const UserSchema = SchemaFactory.createForClass(User);
The @Schema decorator marks a class as a Schema definition. The @Prop decorator defines a property in the document. Our UserSchema has three required properties, name, username, and password. The refreshToken field is where we will store the user’s refreshToken after signup and signin.
Next, open the users.module.ts file, and inject the User model as follows:
import { Module } from '@nestjs/common';
import { UsersService } from './users.service';
import { UsersController } from './users.controller';
import { MongooseModule } from '@nestjs/mongoose';
import { User, UserSchema } from './schemas/user.schema';

@Module({
  imports: [
    MongooseModule.forFeature([{ name: User.name, schema: UserSchema }]),
  ],
  controllers: [UsersController],
  providers: [UsersService],
  exports: [UsersService],
})
export class UsersModule {}
Note how we’re exporting the UserService. We will need it in the AuthModule that we will be creating soon.
Now that the User model has been configured in the users module, we can now inject the model into the users service. Edit the users.service.ts file:
import { Injectable } from '@nestjs/common';
import { InjectModel } from '@nestjs/mongoose';
import { Model } from 'mongoose';
import { CreateUserDto } from './dto/create-user.dto';
import { UpdateUserDto } from './dto/update-user.dto';
import { User, UserDocument } from './schemas/user.schema';

@Injectable()
export class UsersService {
  constructor(@InjectModel(User.name) private userModel: Model<UserDocument>) {}

  async create(createUserDto: CreateUserDto): Promise<UserDocument> {
    const createdUser = new this.userModel(createUserDto);
    return createdUser.save();
  }

  async findAll(): Promise<UserDocument[]> {
    return this.userModel.find().exec();
  }

  async findById(id: string): Promise<UserDocument> {
    return this.userModel.findById(id);
  }

  async findByUsername(username: string): Promise<UserDocument> {
    return this.userModel.findOne({ username }).exec();
  }

  async update(
    id: string,
    updateUserDto: UpdateUserDto,
  ): Promise<UserDocument> {
    return this.userModel
      .findByIdAndUpdate(id, updateUserDto, { new: true })
      .exec();
  }

  async remove(id: string): Promise<UserDocument> {
    return this.userModel.findByIdAndDelete(id).exec();
  }
}
Also update the content of the user.controller.ts file with the following code:
import {
  Controller,
  Get,
  Post,
  Body,
  Patch,
  Param,
  Delete,
} from '@nestjs/common';
import { UsersService } from './users.service';
import { CreateUserDto } from './dto/create-user.dto';
import { UpdateUserDto } from './dto/update-user.dto';

@Controller('users')
export class UsersController {
  constructor(private readonly usersService: UsersService) {}

  @Post()
  create(@Body() createUserDto: CreateUserDto) {
    return this.usersService.create(createUserDto);
  }

  @Get()
  findAll() {
    return this.usersService.findAll();
  }

  @Get(':id')
  findById(@Param('id') id: string) {
    return this.usersService.findById(id);
  }

  @Patch(':id')
  update(@Param('id') id: string, @Body() updateUserDto: UpdateUserDto) {
    return this.usersService.update(id, updateUserDto);
  }

  @Delete(':id')
  remove(@Param('id') id: string) {
    return this.usersService.remove(id);
  }
}
Implement JWT Authentication
Remember in our requirements above, a user needs to be authenticated with a username and password. When the user is authenticated, our server will issue a JSON Web Token (JWT) that can be sent by the client as a bearer token in an authorization header on subsequent requests to validate the user.
Create the Auth Resource
Just as we did with the users resource, run the following command to create the auth resource. You can skip generating the CRUD endpoints.
nest g res auth --no-spec
Implement Passport JWT
We need to create new tokens when a user signs up or logs in. The token will be used to validate users that need to access protected routes. To achieve that we will be making use of some packages:
npm install --save @nestjs/passport @nestjs/jwt passport-jwt
npm install --save-dev @types/passport-jwt
Create a folder named strategies in the auth directory and create two files accessToken.strategy.ts and refreshToken.strategy.ts.
Open accessToken.strategy.ts and add the following code:
import { Injectable } from '@nestjs/common';
import { PassportStrategy } from '@nestjs/passport';
import { ExtractJwt, Strategy } from 'passport-jwt';

type JwtPayload = {
  sub: string;
  username: string;
};

@Injectable()
export class AccessTokenStrategy extends PassportStrategy(Strategy, 'jwt') {
  constructor() {
    super({
      jwtFromRequest: ExtractJwt.fromAuthHeaderAsBearerToken(),
      secretOrKey: process.env.JWT_ACCESS_SECRET,
    });
  }

  validate(payload: JwtPayload) {
    return payload;
  }
}
Open refreshToken.strategy.ts and add these lines of code:
import { PassportStrategy } from '@nestjs/passport';
import { ExtractJwt, Strategy } from 'passport-jwt';
import { Request } from 'express';
import { Injectable } from '@nestjs/common';

@Injectable()
export class RefreshTokenStrategy extends PassportStrategy(
  Strategy,
  'jwt-refresh',
) {
  constructor() {
    super({
      jwtFromRequest: ExtractJwt.fromAuthHeaderAsBearerToken(),
      secretOrKey: process.env.JWT_REFRESH_SECRET,
      passReqToCallback: true,
    });
  }

  validate(req: Request, payload: any) {
    const refreshToken = req.get('Authorization').replace('Bearer', '').trim();
    return { ...payload, refreshToken };
  }
}
Notice in the validate method, we’re extracting the refreshToken and passing it to the returned object. We did that so we can access it when we need to refresh the tokens, as shown later in this guide. The JWT_ACCESS_SECRET and JWT_REFRESH_SECRET need to be configured and set as environment variables. You can generate a random secret using the following command:
node -e "console.log(require('crypto').randomBytes(256).toString('base64'));"
Next, we register the JWTModule and add the AccessTokenStrategy and RefreshTokenStrategy in the AuthModule:
import { Module } from '@nestjs/common';
import { JwtModule } from '@nestjs/jwt';
import { AuthController } from './auth.controller';
import { AuthService } from './auth.service';
import { AccessTokenStrategy, RefreshTokenStrategy } from './strategies';

@Module({
  imports: [JwtModule.register({})],
  controllers: [AuthController],
  providers: [AuthService, AccessTokenStrategy, RefreshTokenStrategy],
})
export class AuthModule {}
Create the DTO files for authentication and signing up:
Update the create-user.dto.ts file located in the users directory with the following:
export class CreateUserDto {
  name: string;
  email: string;
  password: string;
  refreshToken: string;
}
Create a new folder named dto in the auth directory and then create a new file in the dto folder named auth.dto.ts. Paste the following code:
export class AuthDto {
  username: string;
  password: string;
}
Import the UserModule, in the AuthModule, so we can use its service - UserService in the AuthService.
import { Module } from '@nestjs/common';
import { AuthService } from './auth.service';
import { AuthController } from './auth.controller';
import { UsersModule } from 'src/users/users.module';

@Module({
  imports: [UsersModule],
  controllers: [AuthController],
  providers: [AuthService],
})
export class AuthModule {}
Next, we will create a route for signing up a new user, and a route for existing users to sign in.
We need to hash the user’s password, so we install a new package that helps us achieve that argon2.
npm install argon2
Update the auth.service.ts file with the following code:
import { BadRequestException, Injectable } from '@nestjs/common';
import { CreateUserDto } from 'src/users/dto/create-user.dto';
import { UsersService } from 'src/users/users.service';
import * as argon2 from 'argon2';
import { JwtService } from '@nestjs/jwt';
import { ConfigService } from '@nestjs/config';
import { AuthDto } from './dto/auth.dto';

@Injectable()
export class AuthService {
  constructor(
    private usersService: UsersService,
    private jwtService: JwtService,
    private configService: ConfigService,
  ) {}
  async signUp(createUserDto: CreateUserDto): Promise<any> {
    // Check if user exists
    const userExists = await this.usersService.findByUsername(
      createUserDto.username,
    );
    if (userExists) {
      throw new BadRequestException('User already exists');
    }

    // Hash password
    const hash = await this.hashData(createUserDto.password);
    const newUser = await this.usersService.create({
      ...createUserDto,
      password: hash,
    });
    const tokens = await this.getTokens(newUser._id, newUser.username);
    await this.updateRefreshToken(newUser._id, tokens.refreshToken);
    return tokens;
  }

	async signIn(data: AuthDto) {
    // Check if user exists
    const user = await this.usersService.findByUsername(data.username);
    if (!user) throw new BadRequestException('User does not exist');
    const passwordMatches = await argon2.verify(user.password, data.password);
    if (!passwordMatches)
      throw new BadRequestException('Password is incorrect');
    const tokens = await this.getTokens(user._id, user.username);
    await this.updateRefreshToken(user._id, tokens.refreshToken);
    return tokens;
  }

	async logout(userId: string) {
    return this.usersService.update(userId, { refreshToken: null });
  }

  hashData(data: string) {
    return argon2.hash(data);
  }

  async updateRefreshToken(userId: string, refreshToken: string) {
    const hashedRefreshToken = await this.hashData(refreshToken);
    await this.usersService.update(userId, {
      refreshToken: hashedRefreshToken,
    });
  }

  async getTokens(userId: string, username: string) {
    const [accessToken, refreshToken] = await Promise.all([
      this.jwtService.signAsync(
        {
          sub: userId,
          username,
        },
        {
          secret: this.configService.get<string>('JWT_ACCESS_SECRET'),
          expiresIn: '15m',
        },
      ),
      this.jwtService.signAsync(
        {
          sub: userId,
          username,
        },
        {
          secret: this.configService.get<string>('JWT_REFRESH_SECRET'),
          expiresIn: '7d',
        },
      ),
    ]);

    return {
      accessToken,
      refreshToken,
    };
  }
}
We created the signUp and login methods in the AuthService class and some helper functions hashData, updateRefreshTokens, and getTokens.
In the signUp method, we check if a user exists, if not we proceed to creating a new user document, the password is hashed using argon2 before creating the user. After that, we generate two tokens for the client, accessToken and refreshToken.
The logic for login is not so different. We verify the user by comparing the user’s password before issuing new tokens. We’re saving the refreshToken on the user’s document, so that when the client requests for a new accessToken we can verify before issuing a new one to the user. You’ll see how we achieve the refresh logic soon. logout finds a user and sets the refreshToken field as null.
Update the auth.controller.ts with the following lines of code:
import {
  Body,
  Controller,
  Get,
  HttpCode,
  HttpStatus,
  Post,
  Req,
} from '@nestjs/common';
import { Request } from 'express';
import { CreateUserDto } from 'src/users/dto/create-user.dto';
import { AuthService } from './auth.service';
import { AuthDto } from './dto/auth.dto';

@Controller('auth')
export class AuthController {
  constructor(private authService: AuthService) {}

  @Post('signup')
  signup(@Body() createUserDto: CreateUserDto) {
    return this.authService.signUp(createUserDto);
  }

  @Post('signin')
  signin(@Body() data: AuthDto) {
    return this.authService.signIn(data);
  }

  @Get('logout')
  logout(@Req() req: Request) {
    this.authService.logout(req.user['sub']);
  }
}
The auth.controller.ts is pretty straightforward. We created three methods in the class. The AuthController's signUp method calls the signUp method of the AuthService class which creates a new user and returns the auth tokens. The signIn method logs an existing user in and returns a response object that contains the auth tokens, i.e. the accessToken and refreshToken. In the logout method, we made use of the @Req() decorator to extract the request object provided by the express framework. Because of our JWT strategy a user object exists in the request object when a user is signed in. At the moment, we will get an undefined error if we call the logout endpoint because we still need to complete an extra step. We will work on that soon in a section below.
Testing in Postman
It’s time to test the endpoints we’ve created so far. I am using Postman to test the API endpoints, but you can use any API client/tool of your choice.
Create a user with the /signup endpoint:

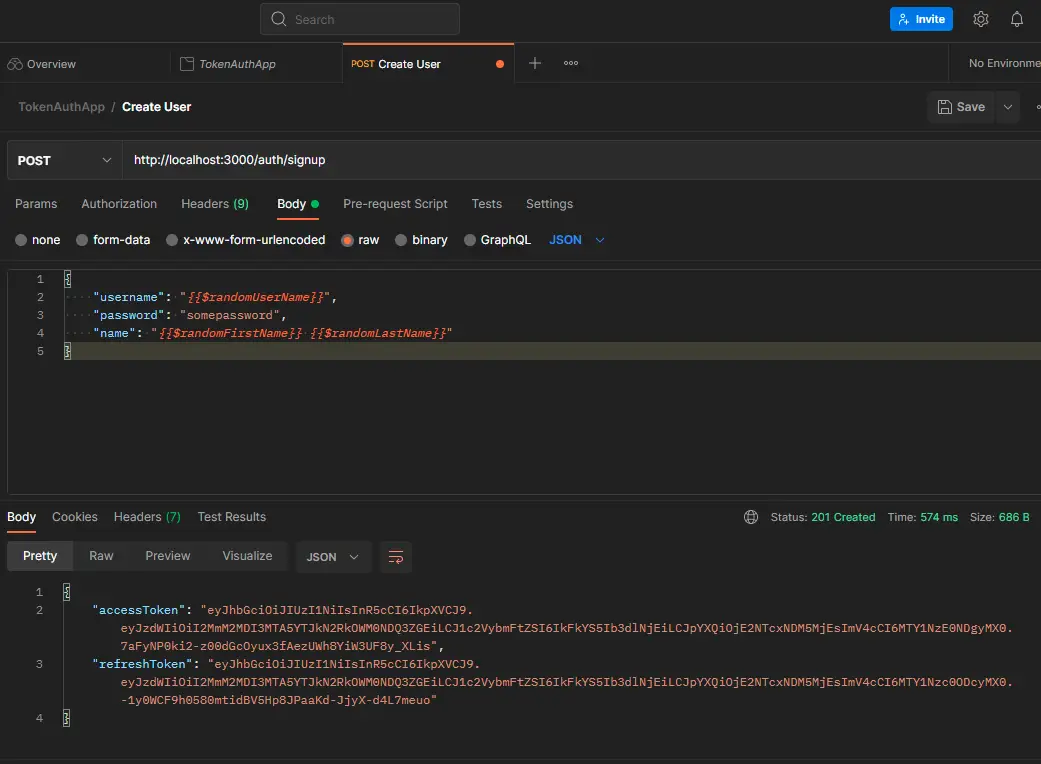
We sent a POST request to the /signup endpoint using Postman, and we got an object containing the accessToken and refreshToken. Let’s check the database and see the new user that was created.

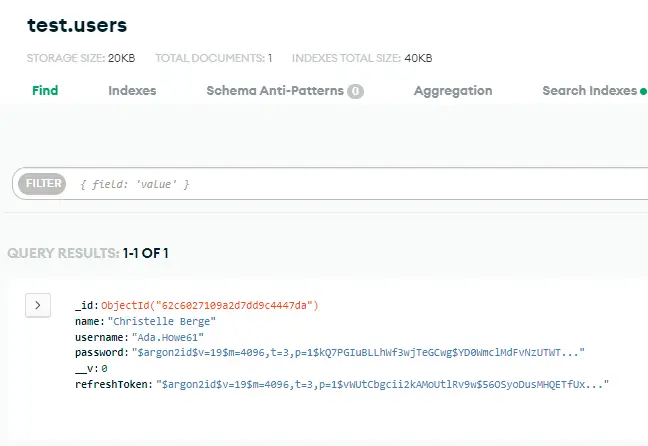
Fantastic! The /signup endpoint works according to our requirements.
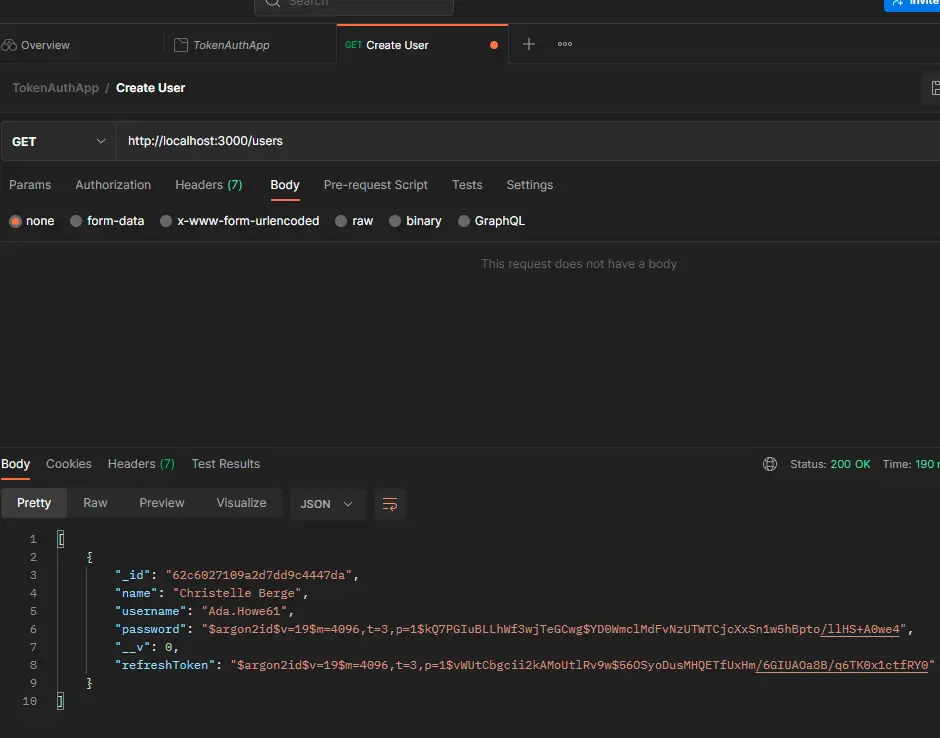
Fetching all existing users
We can also send a GET request to the /users endpoint to get all existing users:

Sign in an existing user
Let’s test the /signin route by sending a POST request with the required payload:

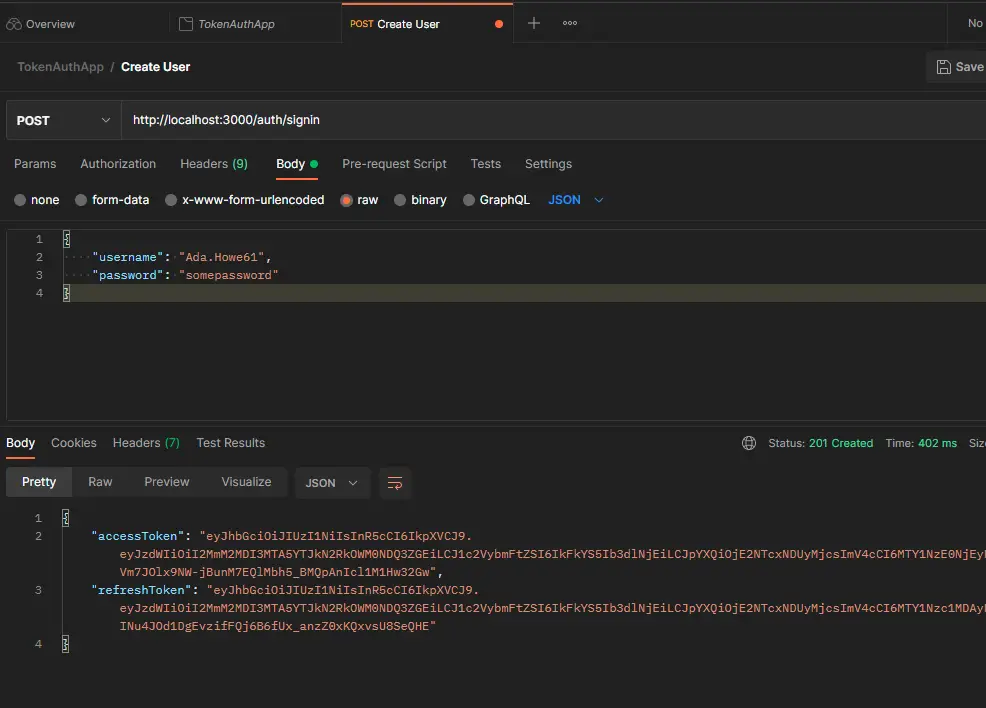
It works! We got the auth tokens after signin in.
Protected Routes
Log a user out
As mentioned earlier, our logout endpoint doesn’t work yet. To successfully log a user out, we need to implement a Guard. In Nest.js Guards determine whether a given request will be handled by the route handler or not. This is commonly known as Authorization. Yes, the logout endpoint is a PROTECTED route and as you’ll soon see, all protected routes must have a GUARD. In our project, we need two guards, an AccessTokenGuard and a RefreshTokenGuard. The AccessTokenGuard will be used in protecting any PROTECTED route. The RefreshTokenGuard is only used for the route that refreshes the accessToken.
Creating the AccessTokenGuard
In your project’s src directory, create a new folder named common. In the common folder, create another folder named guards. Create a new file in the guards folder named accessToken.guard.ts and type the following code:
import { Injectable } from '@nestjs/common';
import { AuthGuard } from '@nestjs/passport';

@Injectable()
export class AccessTokenGuard extends AuthGuard('jwt') {}
Also, in the same guards folder, create another new file named refreshToken.guard.ts:
import { Injectable } from '@nestjs/common';
import { AuthGuard } from '@nestjs/passport';

@Injectable()
export class RefreshTokenGuard extends AuthGuard('jwt-refresh') {}
In both files, we created a class that extends the AuthGuard class that comes with the @nestjs/passport package. We also ensured we passed the string that matches what we defined when creating the AccessTokenStrategy and RefreshTokenStrategy.
Next, let’s make use of the guards we created. In the auth.controller.ts file, add the following update to the logout method:
@UseGuards(AccessTokenGuard)
@Get('logout')
logout(@Req() req: Request) {
  this.authService.logout(req.user['sub']);
}
We added a new decorator @UseGuards provided by Nest.js. We passed in our AccessTokenGuard class to the decorator. Now, the /logout route is protected, and because of that we should be able to get the req.user object in that route. It’s time to test with Postman.
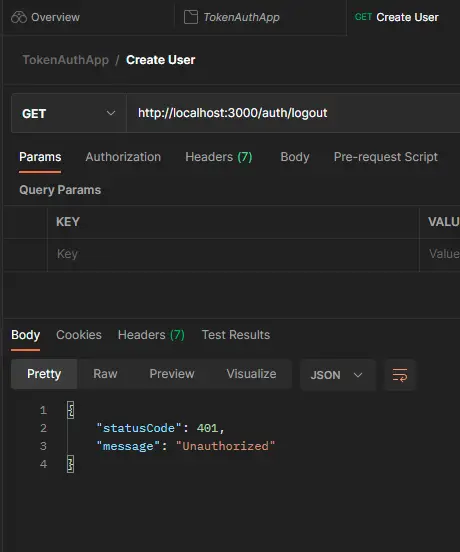
If we call the /logout route without passing a valid accessToken in an Authorization Header, we should get an Unauthorized error as shown below.

If we add a valid Bearer Token in the Auth Headers, the route should work. We sign in as an existing user to get an accessToken, copy the token, and use it in making a request to the logout route.
The /logout route works fine. Let’s add our AccessTokenGuard to the remaining PROTECTED routes. Open the user.controller.ts file and add the Guard to the update and delete methods:
@UseGuards(AccessTokenGuard)
@Patch(':id')
update(@Param('id') id: string, @Body() updateUserDto: UpdateUserDto) {
  return this.usersService.update(id, updateUserDto);
}

@UseGuards(AccessTokenGuard)
@Delete(':id')
remove(@Param('id') id: string) {
  return this.usersService.remove(id);
}
Refreshing the Tokens
Now for the last part of our requirements. The accessToken works great but for security reasons we configured the token to expire in a noticeably brief time, 15mins. This means once a user logs in, after 15 minutes they won’t be able to access any protected route on the server. This is not a good user experience. This is the reason we needed to implement the refreshToken. The client uses a refresh token to request a new access token when the existing access token expires.
Let’s implement the API endpoint for refreshing tokens:
In the auth.service.ts file, create a new method called refreshToken:
async refreshTokens(userId: string, refreshToken: string) {
  const user = await this.usersService.findById(userId);
  if (!user || !user.refreshToken)
    throw new ForbiddenException('Access Denied');
  const refreshTokenMatches = await argon2.verify(
    user.refreshToken,
    refreshToken,
  );
  if (!refreshTokenMatches) throw new ForbiddenException('Access Denied');
  const tokens = await this.getTokens(user.id, user.username);
  await this.updateRefreshToken(user.id, tokens.refreshToken);
  return tokens;
}
The refreshToken method accepts a userId and a refreshToken. It finds the user and checks if a refreshToken exists on the user document. We then verify the hashed refreshToken from the user document with the refreshToken argument. If it matches, we generate new tokens for the user and send to the client.
Open the auth.controller.ts file and add a new refreshToken method to the class:
@UseGuards(RefreshTokenGuard)
@Get('refresh')
refreshTokens(@Req() req: Request) {
  const userId = req.user['sub'];
  const refreshToken = req.user['refreshToken'];
  return this.authService.refreshTokens(userId, refreshToken);
}
When we make a GET request to the /auth/refresh route, the controller extracts the userId and refreshToken from the req.user object. We then call the refreshToken method in the AuthService class and pass the userId and refreshToken as arguments to generate new tokens for the client. Let’s see this in action:
If we check our database we should see that a new refreshToken hash will be present in the user’s document.
Conclusion
Congratulations! If you were able to complete this guide, you should have all you need to implement JWT Authentication with the Refresh Token feature in any Nest.js project. I hope you enjoyed working on this project as much as I did. You can check the repository on Github for reference. If you have any questions or comments, feel free to reach me on twitter @elvisduru.